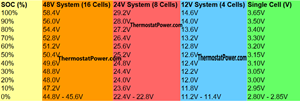
Voltage imbalance in LiFePO4 batteries can arise due to several factors. Manufacturing variations, differences in charge and discharge rates, or uneven cell aging can cause some cells to have higher or lower voltages than others. This imbalance can lead to issues like reduced usable capacity and, in extreme cases, the risk of overcharging or deep discharging individual cells, which can shorten the battery’s lifespan.
Voltage equalization, or balancing, is a technique used to ensure all cells in a battery pack maintain similar voltage levels, optimizing both the performance and safety of the pack. Several methods can be used to achieve this balance, and each has its own set of pros and cons.
Different Methods of Equalizing LiFePO4 Batteries
When it comes to equalizing LiFePO4 batteries, the main techniques fall into four categories: passive balancing (using a Battery Management System, or BMS), active balancing, manual balancing (top balancing), and bottom balancing.
Passive Balancing (Using BMS)
A common and straightforward method for equalizing battery cells is through passive balancing using a Battery Management System (BMS). A BMS monitors and controls the voltage of each cell, preventing overcharging and over-discharging.
How Passive Balancing Works: When one or more cells reach the maximum voltage threshold (usually 3.65V for LiFePO4 cells), the BMS shunts excess energy away from these overcharged cells, allowing the other cells in the pack to catch up.
Step-by-Step Guide:
-Ensure your battery pack has a BMS that supports passive balancing.
-Connect the BMS to the battery pack as per the manufacturer’s instructions.
-Use a LiFePO4-compatible charger to begin charging the battery pack. The BMS will automatically monitor and balance the cells during charging.
Pros and Cons:
Advantages: This method is simple and requires no manual intervention. It’s an automatic process that ensures consistent balancing over time.
Disadvantages: Passive balancing is generally slower and less efficient, as the excess energy is dissipated as heat. It may take several charging cycles to achieve a balanced pack.
Active Balancing (Advanced Balancers)
Active balancing is a more sophisticated method that uses an advanced balancer to redistribute charge among the cells. Unlike passive balancing, which simply shunts excess charge away, active balancing moves charge from higher-voltage cells to lower-voltage ones.
How Active Balancing Works
The balancer monitors the voltage of each cell and transfers energy from the cells with higher voltage to those with lower voltage, thus equalizing the pack more efficiently.
Step-by-Step Guide:
-Purchase and install an active balancer on your battery pack according to the manufacturer’s guidelines.
-Connect the balancer, ensuring all wiring is secure and properly configured.
-Allow the balancer to operate as it redistributes charge between the cells to equalize their voltages.
Pros and Cons:
Advantages: Active balancing is more efficient and faster than passive balancing. It can help maintain cell voltage balance even during use, enhancing the overall lifespan of the battery.
Disadvantages: It’s more expensive and requires additional hardware. The setup process can also be more complex.
Manual Balancing (Top Balancing)
What is Top Balancing
Top balancing is a manual method where each cell is individually charged to the same maximum voltage. This process requires close monitoring and careful handling. This involves charging each cell individually to the upper voltage limit (typically 3.65V for LiFePO4 cells) to bring them to the same level.
Step-by-Step Guide:
-Discharge the entire battery pack to a safe lower voltage (around 3.0V per cell) to avoid any cell reaching over-voltage during the process.
-Use a LiFePO4-compatible charger to charge each cell individually to 3.65V.
-Use a multimeter to measure the voltage of each cell, ensuring they all reach the target voltage.
-Once each cell is balanced, reconnect the cells in series and charge the entire pack using a standard LiFePO4 charger to complete the process.
Pros and Cons:
Advantages: This method provides precise control over each cell’s voltage, ensuring an accurate balance.
Disadvantages: It’s time-consuming, requires manual intervention, and involves careful monitoring to prevent overcharging, making it less suitable for routine maintenance.
Bottom Balancing (Alternative Method)
What is Bottom Balancing:
Bottom balancing is less common but can be useful for certain applications. It involves discharging all cells to a specific low voltage. This method discharges all cells to the same low voltage (typically 2.5-2.8V) to equalize them.
Step-by-Step Guide:
-Discharge the entire battery pack to a low voltage, around 2.5-2.8V per cell.
-Allow the cells to equalize naturally at this lower voltage level.
-Recharge the entire pack using a BMS-equipped charger, which will balance the cells during the charging process.
Pros and Cons:
Advantages: It can help prevent deep discharge issues in some applications, ensuring that no cell drops too low.
Disadvantages: Bottom balancing is riskier and requires precise monitoring, making it less common for regular battery maintenance.
Safety Considerations When Equalizing LiFePO4 Batteries
Avoid Overcharging: Always use a charger specifically designed for LiFePO4 cells, which stops charging at 3.65V per cell.
Monitoring: Regularly monitor the voltage and temperature of cells during the equalization process, especially when manually balancing.
Use Proper Equipment: Ensure all tools, chargers, and balancers are compatible with LiFePO4 chemistry to prevent damage or safety hazards.
Regular Maintenance and Periodic Balancing
To keep your LiFePO4 battery pack in optimal condition, it’s important to check cell voltages periodically. If you notice a significant voltage disparity, balance the cells using one of the above methods. Using a BMS or an active balancer for ongoing monitoring can help maintain cell balance with minimal effort.
